-
Installing .NET
-
Installing .NET is the first step toward building modern applications using C#, ASP.NET Core, desktop apps, mobile apps, and more. There are two common ways developers install .NET:
- Installing Visual Studio, which automatically installs .NET and related tools
- Installing the .NET SDK directly for lightweight or CLI-based development
If you are new to development, installing Visual Studio is usually the easiest and most complete option. Visual Studio provides a full graphical interface, debugging tools, project templates, and automatic SDK installation.
Install .NET Using Visual Studio (Recommended)
Visual Studio is Microsoft’s official integrated development environment (IDE). When you install Visual Studio, you can select specific development workloads, and the required .NET SDK and runtimes are installed automatically.
Download Visual Studio from: https://visualstudio.microsoft.com/downloads/
Choose Visual Studio Community (free for individuals) unless you require Professional or Enterprise editions.
Step 1 — Run the Visual Studio Installer
After downloading the installer:
- Run the Visual Studio Installer.
- You will see a screen with multiple workloads.
- This is where you choose what type of development you want to do.
Step 2 — Select the Right Workload
Visual Studio uses a workload-based installation model. Instead of installing everything, you select what you need.
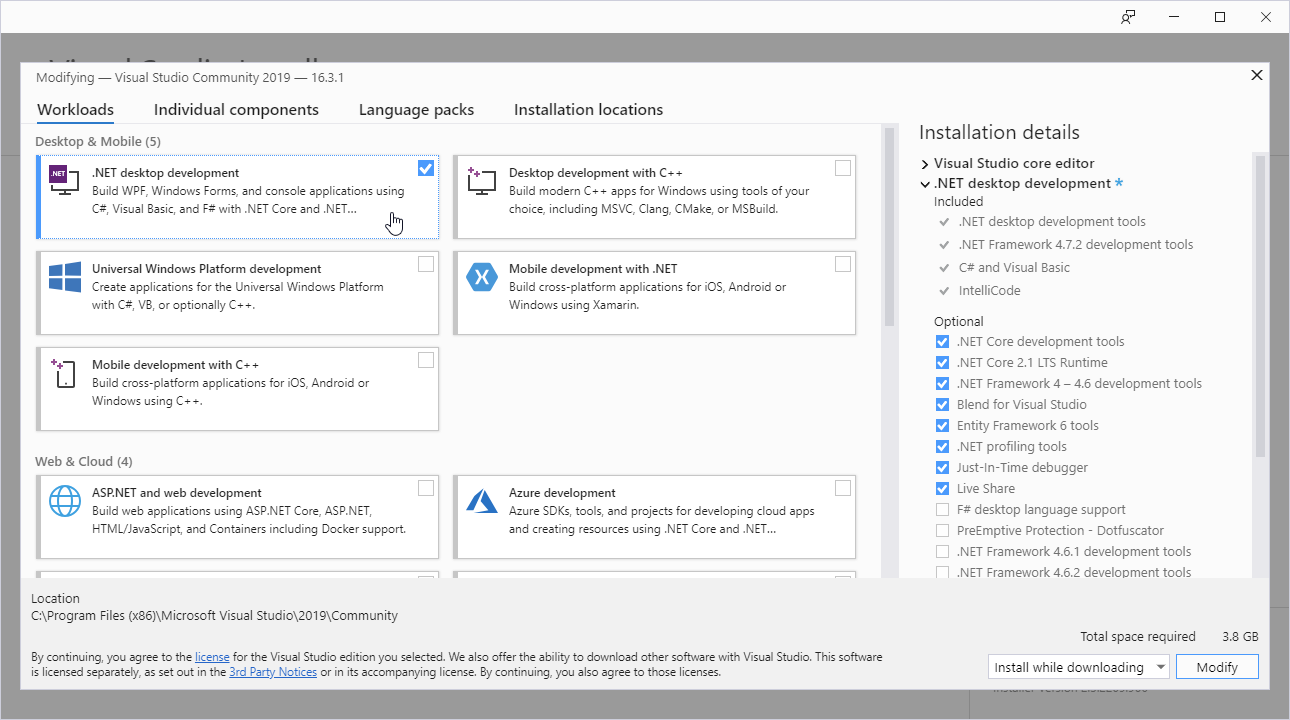
Common Workloads for .NET Developers
.NET Desktop Development
Includes:- Console applications
- Windows Forms
- WPF applications
- Required .NET SDK
Best for desktop development and beginners learning C#.
ASP.NET and Web Development
Includes:- ASP.NET Core
- Web APIs
- Razor Pages
- Required runtime and SDK
Best for building websites and backend services.
Mobile Development with .NET
Includes:- .NET MAUI
- Mobile development tools
Useful if you plan to build cross-platform mobile apps.
When you select a workload, Visual Studio automatically installs the required .NET SDK and runtime in the background. There is no need to install the SDK separately when using Visual Studio.
Step 3 — Click Install
After selecting workloads:
- Click Install
- Wait for the setup to download and install required components
- Restart if prompted
Installation may take some time depending on selected workloads and internet speed.
Step 4 — Launch Visual Studio
Once installed:
- Open Visual Studio
- Sign in (optional but recommended)
- You will see the start window with options like:
- Create a new project
- Open an existing project
Your .NET environment is now ready.
Can You Add More Workloads Later?
Yes. Visual Studio allows you to modify installation at any time.
To add new tools:- Open Visual Studio Installer
- Click Modify
- Select additional workloads
- Click Install
This flexibility is useful when your project requirements change.
Where Is Visual Studio Installed?
By default, Visual Studio installs in:
C:\Program Files\Microsoft Visual Studio\The .NET SDK installs and typically located in:
C:\Program Files\dotnet\Visual Studio uses this SDK internally to build and run applications.
Summary
Installing Visual Studio is the simplest way to set up a complete .NET development environment. By selecting the appropriate workloads during installation, you automatically install the required SDK, runtime, and tools needed to build modern applications.
Visual Studio provides the interface, while the .NET SDK works behind the scenes to build and run your applications. Once installed, you are ready to start creating console apps, web applications, desktop software, and more.